Seasonal Baking: Rustic Olive and Rosemary Focaccia for Late Summer
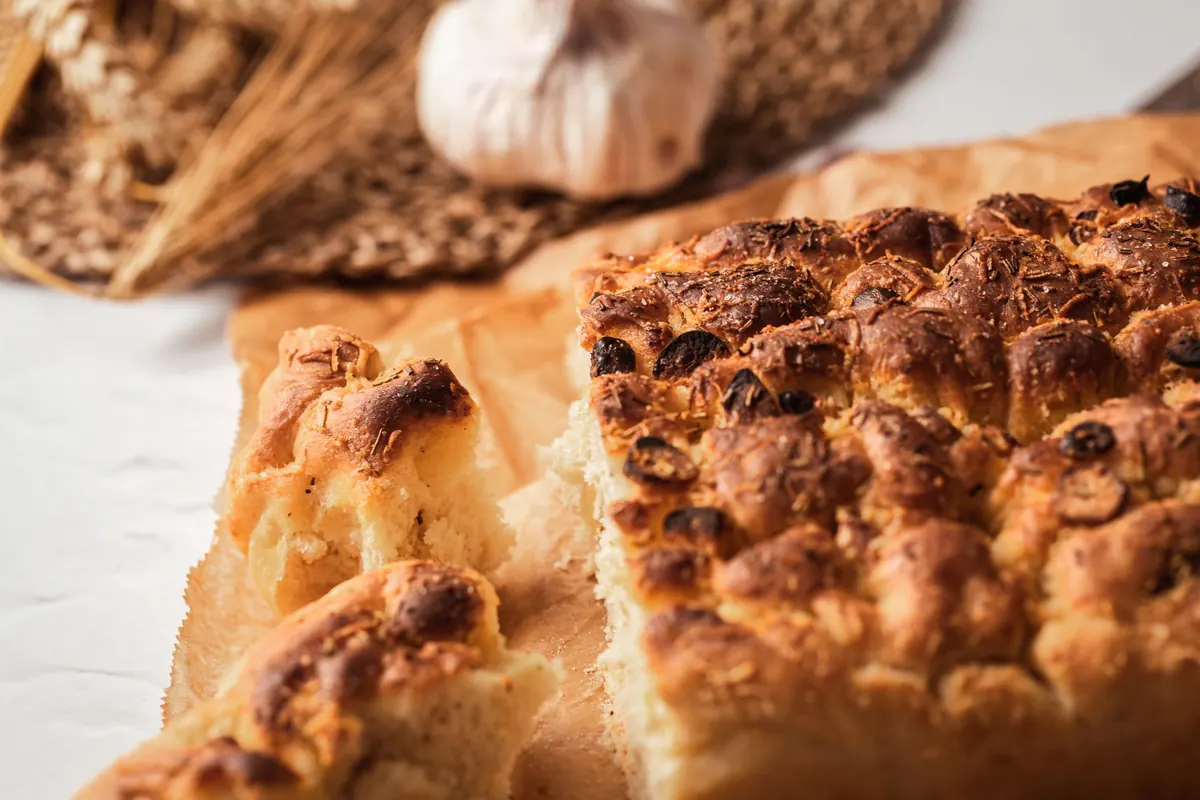
By the end of August the rosemary outside the kitchen door has stopped putting out soft new growth. The leaves are darker and oilier, and they snap rather than bend. That is the moment to tear off a handful and press it into bread. The jar of olives at the back of the cupboard, bought for a plate of drinks in July, is also ready for better work than another bowl of snacks.
Focaccia suits this kind of cooking. It asks for patience rather than precision, it forgives a warm kitchen, and it turns a modest amount of oil, salt and herbs into something generous enough for a whole table. The version below is built on a wet dough, a long cold rest and a heavy hand with the olive oil. It fills a 30 by 40 cm tin and takes most of its time unattended.
Why this bread belongs to the end of summer
High-summer focaccia is often a vehicle for tomatoes, basil, whatever is glutting the garden. Late summer is different. The herbs have had months to build up essential oils, the evenings are cool enough that a dough left on the counter behaves predictably, and the appetite shifts from cold plates towards something warm and salty.
Rosemary is the herb that makes the case best. It is resinous and slightly piney, and it holds its flavour through a hot bake in a way that softer herbs do not. That strength is also the reason to use it sparingly. Two or three good sprigs, stripped and chopped, will scent an entire tray. A whole bush's worth will taste like a Christmas candle.
Olives bring the salt and the savoury depth. Use a good handful of something you would happily eat on its own: Taggiasca, Castelvetrano, Kalamata, or a dry-cured black olive if you like a firmer bite. Pit them yourself, or buy them pitted and pat them dry before they go anywhere near the dough.
The ingredients, and where to be fussy
This makes one large tray, enough for six to eight people as part of a meal. For a smaller tin, halve everything and reduce the baking time by a few minutes.
- 500 g strong white bread flour, ideally 12 to 13 percent protein
- 375 g lukewarm water, about 75 percent hydration
- 10 g fine sea salt
- 4 g instant dried yeast, or about a teaspoon
- 30 g olive oil for the dough, plus considerably more for the tin and the top
- 150 g pitted olives, roughly torn or halved
- Leaves from 2 to 3 rosemary sprigs, finely chopped
- Flaky sea salt to finish
A few notes before you weigh anything
Plain supermarket bread flour works. If yours is weak, drop the water to 350 g and the dough will be easier to handle, though the crumb will be a little tighter. Wholemeal flour can replace up to 20 percent of the white, but expect to add another 15 to 20 g of water, because it drinks more.
Taste your olives before you use them. Brine-packed ones vary wildly in saltiness, and a very salty olive plus the flaky salt on top can tip the whole tray over. If they are aggressive, rinse them and blot them dry.
Chop the rosemary properly. Whole needles scorch and turn wooden in the oven, and they have a way of lodging between the teeth. A minute with a knife is worth it.
Mixing and the long, slow rise
The dough is wet and slack at first. Do not try to knead it in the usual way. Time and a few folds do the work.
- Whisk the flour and yeast together in a large bowl. Pour in the water and mix with a spatula or a wet hand until no dry flour remains. Cover and leave for 30 minutes.
- Sprinkle the salt over, add the 30 g of olive oil, and squeeze the dough through your fingers until both are fully worked in. It will feel slippery, then come back together.
- Cover and leave at room temperature. Every 30 minutes for the next hour and a half, do a set of stretch and folds: wet your hand, lift one side of the dough up and over the middle, turn the bowl a quarter turn, and repeat four times. Three or four sets is plenty.
- Let the dough rise until it is jiggly and roughly half again its original size, about two hours in a warm kitchen. Then cover it and put it in the fridge for 12 to 24 hours.
The cold rest is not essential, but it is the difference between good focaccia and the kind people ask about. It slows the yeast, gives the flour time to fully hydrate, and builds flavour that a two-hour rise simply cannot produce. If you want bread the same day, leave the dough out for another hour and skip the fridge, then add 45 minutes to the final proof.
Dimpling, topping, and the order that matters
Pour three or four tablespoons of olive oil into the tin and spread it right into the corners. Tip the cold dough in, turn it once so it is coated, and then leave it alone for 20 minutes. Cold dough fights back. After a short rest it will stretch to the edges with a gentle nudge from your fingertips.
Cover the tin and let it proof at room temperature until it is visibly puffy and half-filled with air, usually one and a half to three hours depending on how cold the dough was. If you press a finger in and the dent springs back slowly and only partly, it is ready.
Now dimple. Oil your fingertips and press straight down, all the way to the base of the tin, in rows about three centimetres apart. Do not drag or tear. Work from the middle outwards, and let the dough flood back around your fingers each time. The dimples are not decoration; they are wells that hold oil and salt, and they stop the surface from doming into a single bubble.
Scatter the olives and rosemary over the top and press them in lightly. Drizzle with another two tablespoons of oil and finish with flaky salt. Add the toppings after dimpling, not before, so they settle into the hollows rather than being pushed to the edges.
Baking in a home oven
Preheat to 240°C conventional, or 220°C if your oven runs hot, with a baking stone or an inverted heavy tray on the middle-lower shelf. Give it a full 30 to 40 minutes. The stone is not there to bake the bread directly but to deliver a hard punch of heat to the base, which is what makes the bottom crisp instead of pale and flabby.
Heat from below
Slide the tin straight onto the hot stone. If you do not have one, put the tin on the lowest shelf and accept that you may need to finish the top under the grill for a minute or two. Fan ovens work, but they dry the surface and brown the top before the middle sets, so reduce the temperature by 20°C and check early.
Reading the bake
Twenty minutes in, lift a corner with a spatula. The underside should be deep golden and slightly uneven, with dark patches where the oil fried the crust. The top should be burnished, not black. If the base is still pale, move the tin down and give it five more minutes. If the top is racing ahead, lay a sheet of foil loosely over it.
Total baking time is usually 20 to 28 minutes. Cool in the tin for five minutes, then slide the bread onto a rack so the base does not steam. Focaccia is at its best within a few hours, warm or at room temperature. After that, split it and griddle the cut sides in a dry pan, or reheat it at 180°C for five minutes.
Small variations worth trying
- Halve cherry tomatoes and press them in alongside the olives. They will slump and sweeten in the oven.
- Soak thin slices of red onion in cold water for ten minutes, dry them, and scatter them over the oiled dough before baking.
- Swap rosemary for thyme if the woody stems are getting the better of you, but double the quantity.
- Add a teaspoon of honey to the water when mixing, which encourages browning without making the bread sweet.
Fitting the bake around your day
The most practical schedule is a two-day one. Mix the dough in the evening, let it rise for two hours with a few folds, and put it in the fridge before you go to bed. The next morning, oil the tin, stretch the cold dough into it, and leave it to proof while you get on with something else. Bake it at lunchtime and eat it while it is still warm, with a plate of tomatoes and something cold to drink.
Two things are worth checking in advance: that your tin really is the size you think it is, and that your oven reaches the temperature it claims. An oven thermometer costs very little and answers a question that guessing never settles. Beyond that, the bread is forgiving. If the dough is too slack, oil your hands and keep going; if the kitchen is cold, give the proof another hour and check it rather than the clock.
Photo: Lucie Liz / Pexels